.jpg)
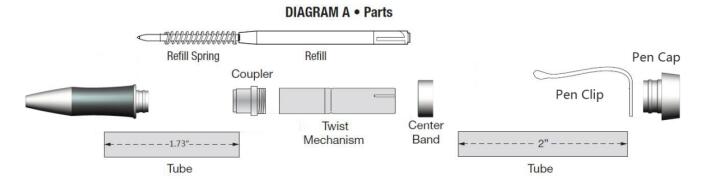
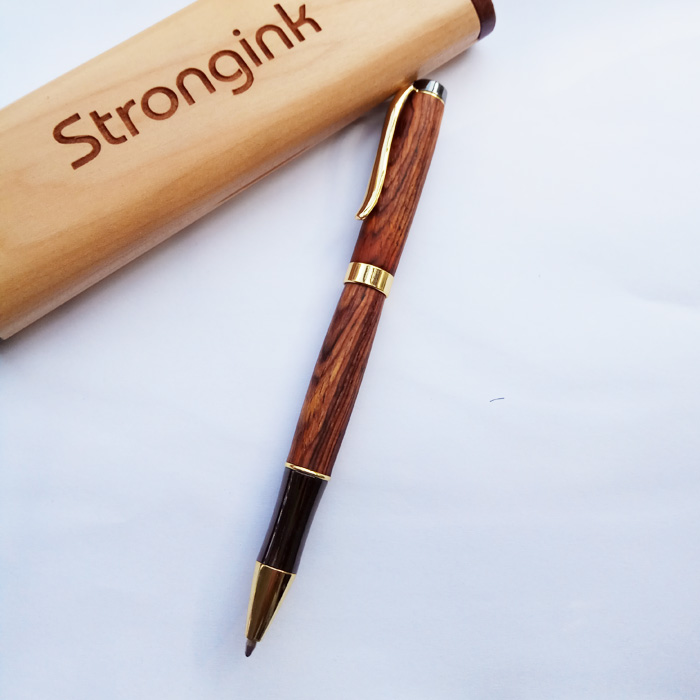
Kit Features:
This instrction is for Old type PKM-3(PKM-3 kits bought after Dec.1 2021 don't use this instruction)
• Easy to turn with straight tubes
• Minimum parts - easy to assemble
• Available in multiple finishes
• Uses Parker® Style Refill
Overall Length: 5-1/2” Long
Required Accessories:
• 7 mm Pen Turning Mandrel
• Drill Bit: 8mm
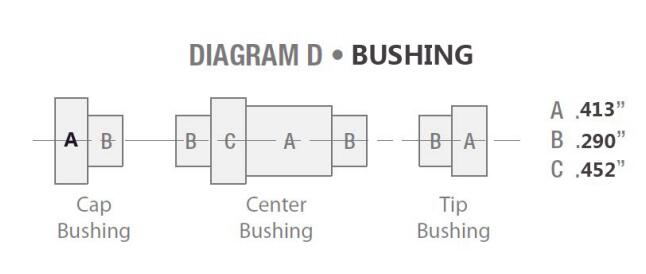
• Bushing set(3 pc) -#BUM-3
• Barrel Trimming set
• Live Tailstock Center
• 2 Part Epoxy Glue or Insta Cure (Cyanoacrylate) Glue
• Pen Blank: Minimum Size: 5/8” x 2-1/4”
.jpg)
Preparing the Blank:
• From 5/8" or larger square stock, Cut 2 blank to the length of the tube and add 1/16” for squaring off.
• Drill 8mm holes lengthwise through the blanks.
• Spread glue over the tubes, insert the blanks with a twisting motion to spread the glue evenly inside.
• Center the tubes lengthwise inside the blanks.
• When the glue is dry, square the ends of the blanks. Use a 8mm barrel trimmer .Take the excess material down flush with the ends of the brass tube. (do not trim beyond
the length of the tube since this may interfere with operation of the mechanism and assembly). Use a barrel trimmer to clean the inside of the tube.
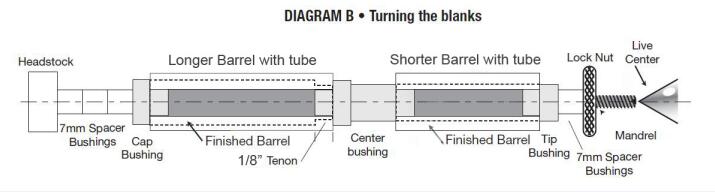
Turning the Blank
• Mount the wide bushing, one wood blank (cap) and center bushing on the mandrel as indicated in Diagram B.
• NOTE: The center bushing has two shouldered diameters made to match the wide and narrow bushings. The second wood blank should be mounted next to the center bushing, and the third (narrow) bushing mounted last (See Diagram B). Make sure that the center bushing is positioned properly to turn the cap and body to different diameters matching the outside dimensions of the bushings. The cap is the wider, and the body is narrower. For the best results, the blanks must be turned to the exact diameter of the bushings. After final turning and before finishing, a tenon must be cut in the cap to accommodate the center band.
• The diameter of the tenon should match the narrow diameter of the center bushing. To ease the turning of the tenon, slide
the center bushing off the mandrel and turn it around 180 degrees. Next, slide the center band onto the bushing (flat end towards the wood) and replace it on the mandrel as indicated in Diagram B.
• The length of the tenon can be approximately 1/8".
This is done to allow the pen body to inset into the center band when closed. When ready for the final cut, slide the center band from the bushing onto the tenon to test for fit. The proper diameter for the pen cap body should be the same as the outside diameter of the center band, When the proper fit is obtained, move the band away from the wood and finish the blank. You may then permanently mount the band by adhering with a drop of glue.
• NOTE: When turning this blank near the center bushing, use a small piece of tape to secure the center band to the bushing so it does not spin and possibly hit your turning tool.
• Sand both blanks and then finish the blanks with your choice of polish and wax.
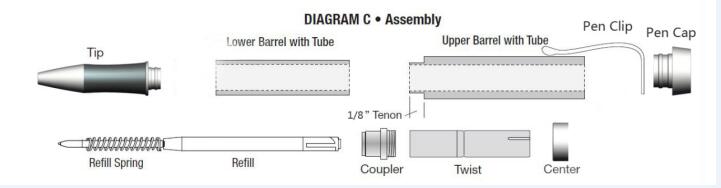
General Assembly Hints:
• Line up the pen parts according to the Diagram C.
• Press the cap/clip assembly into the pen blank opposite the tenon.
• Glue the center band onto the tenon you cut in the pen cap body making sure you place the squared end against the wood.
• Insert the pen tip into the other tube (the shorter tube);press together
• Insert the threaded coupler into the opposite end of the pen body leaving the threads exposed; press together.
• Insert the pen refill—with the spring—into the pen body.
• Screw the twist mechanism onto the coupler.
• Push the two pen halves together aligning the grain as desired.
• The pen is operated by twisting the halves in opposite directions to extend or retract the point. If the pen point is not retracting smoothly, try to stretch the spring and retry.
BUSHINGS
.jpg)
PKPARK-G / PKPARK-S / PKPARK-P PSI Woodworking Products
Author: Strongink Pen Kits